Showing posts with label bakery. Show all posts

Monday, November 18, 2013

Spice Cupcakes In A Jar


Some of the ingredients I used
Yes, You read that correctly... Cupcakes in a jar. I saw this on the cooking channel, and I just thought it looked so cool... so I tried it for my recipe for the week. This was basically just a tasty experiment.

 The first thing that happened was Mom and I discussed, the kind of frosting that would be in between the cupcake layers. We decided instead of having frosting in between the layers plus on top, I should do a filling and a frosting. Why? Mom pointed out that just frosting in between the cupcakes would be too sweet, a lighter filling would be nicer... plus it was an opportunity to add a different dimension to the cupcakes.


I used a box of Duncan Hines Spice Cake mix. I simply followed the directions on the box, poured the batter into regular sized cupcake pan (jumbo cupcakes would not have fit into the jars I had on hand.) After letting the cupcakes cool a little, I started making the filling. The filling has three ingredients... 8oz cream cheese, 1 tsp vanilla and about 1/4 cup powered sugar (that part really depends on how sweet you would like it).


You cream the cream cheese for about 3 minutes and then you add the vanilla and powered sugar. After about a minute of beating it, taste it to determined if you want to put more powered sugar or not.
The jar I used
Now comes the fun part (some assembly required!) I cut the cupcakes in half. In each jar there were three halves. Put one half in the jar and put some filling on it, then add the next half and some more filling on that. And then add the third half and don't put any filling on it because the frosting will be the final layer. And if you, by the way, have 3 or 4 cupcakes that can't be put into  a jar because you either don't have enough jars, or you run out of filling, they make great snacks and practice for your piping/creativity skills :)
My leftover cupcakes, They have some leftover frosting to top them off
Once I was done with building the layers, I made the frosting. The frosting has four ingredients... 1 cup pure pumpkin, 1 tsp Cinnamon, 11/2 cup heavy cream, and 1 to 2 cups powered sugar (once again its to taste). The first thing you do is  whip the heavy cream as if you're making whipped cream. While the heavy cream is whipping, mix the pumpkin and cinnamon. Once the heavy cream is to the whipped cream consistency, add the pumpkin mix. After that is combined (about 2 minutes) and 1 cup of powered sugar. Once again taste it to see if you want more powered sugar.

The next part is frosting the cupcakes in the jars. You can use a spoon to plop it on top or you can cut the corner of a Zip-Loc bag , put some frosting in it and frost the cupcakes that way. I did the latter after doing the former for the filling... using the bag is much easier than using a spoon... and it looks neater too. When you're done, they have to go in the fridge  because they have uncooked cream cheese and whipping cream.

In the fridge
The taste test... this reminds me of a seasonal recipe. The frosting does in fact taste like pumpkin flavored whipped cream, which for the record, is really good! The filling is good too, not too sweet, but not too cream cheese-like. But the whole cupcake together... well, it was like something was missing. Maybe they were too light or didn't have any zing. 
Overall: I like the whole cupcake in the jar thing, but the cupcake plus the whipped cream frosting plus the filling didn't really work together, at least in my opinion. However, I like the frosting and filling and I think they would be good with a different cupcake. Perhaps I will try this filling with a traditional frosting. And maybe add some cranberries to it... I do love pumpkin and cranberries together! This recipe was a 4 out of 5.

Buffy (left) and Einstein (right) checking it out.
P.S. Mom pointed out that the problem with the frosting is that the longer it is in the fridge, on the cupcake, it might make the cupcake more moist than usual.

Wednesday, November 13, 2013

Cranberry Christmas Cake


A couple of weeks ago, Mom sent me the link for this recipe and I wanted to use it for my recipe of the week. There was one problem with that plan of mine... it was October and no grocery stores had fresh cranberries. Flash forward a couple of weeks, Mom and Dad were at the store and Mom found some and grabbed a bag.


The batter before cranberries


This recipe is called Cranberry Christmas Cake. It reminds me of a coffee cake... the kind of cake that is good as a snack anytime of day. The awesome thing about this recipe is, it only has 6 ingredients - 3 eggs, 2 cups sugar, 2 cups flour, 3/4 cups butter, 1 teaspoon vanilla, and 12 oz (one bag) fresh cranberries.

 
The batter with cranberries


You might be wondering "well, how does it rise if there is no baking soda or baking powder?" Or "does it not rise at all?" It does rise. Instead of using baking powder or baking soda, you cream the sugar and eggs till the batter almost doubles. This step helps it rise, but it also makes it light. While you're creaming the eggs and sugar, you should butter your pan (or spray it).


After you're done creaming it, you add the butter and vanilla. Then you add the flour until it is just combined (that way you don't lose the fluff). And finally you stir in the cranberries and put it in your pan.I put it in for exactly 40 minutes at 350.

Dixie (left) and Einstein (right) checking out the foreign object.
The taste test... This is an awesome cake. I love how it is not dense, but not to fluffy, it is just right. I also like how the bottom is not burnt. I am a huge fan of the way the cranberries sort of just melted... almost. When you taste a bite of the cranberries it's a pop of tartness that balances out the sweetness of the cake perfectly.


This recipe is without a doubt 5 out of 5! In fact I made this last night and it is all most gone!I think it is a new favorite of my dad's... he took a piece for lunch after having a piece with breakfast!

The link to the recipe is here.

Friday, October 25, 2013

Chocolate chip cookies

My Brother got braces this week... and naturally he isn't going to be allowed to eat certain foods. So over the weekend before he got his braces, we had a cookie party of sorts. We made Milk Chocolate Cookies (which I have previously blogged about) and  Chocolate Chip Cookies. 

I realized before I made the Chocolate Chip Cookies that everyone has they favorite chocolate chip recipe, but I don't think I realized just how many recipes were out there. There are recipes that say to freeze the dough for 24 to 48 hours, to make it more of a soft chewy cookie, and there were others that called for more butter to make them nice and crunchy. In the end I found this article The Best Chocolate Chip Cookie Recipes It is a really awesome article that has a whole bucket load of chocolate chip cookie recipes, from classic chocolate chip cookie recipes (which differ from soft and chewy to crunchy) to the more experimental chocolate chip cookie recipe (like bacon chocolate chip cookies and a egg-less chocolate chip cookies).

Guess what kind of chocolate chips we used? These cool new ones that Mom found. They are Hersey's baking melts. What is cool about them is when the cookies are warm the shell of the chocolate chips are almost hard and then when you take a bite the chocolate chips were all melted and gorgeous looking, the only problem with them is since they are bigger chips they did  not mix consistently into the dough, which caused  some of the cookie dough to not get any chocolate chips in them :-/and other areas to have too many chips.

I am pretty sure that the cookies were in the oven too long because they weren't as chewy as the recipe promised. I noticed that after 5 minutes in the oven they started to get soupy looking, which caused them to flatten out. I think this lead them to being not as soft and chewy.

They still tasted good, but if you put this cookie on a plate next to the Milk Chocolate Cookie and asked me to choose, I'd most probably go for the Milk Chocolate one. Maybe it's because they're chocolate on chocolate, or maybe because they are chewy or maybe it is just because I find the dough of any classic chocolate chip cookie to be kinda dull. 
Einstein

Overall this recipe was a 3 (so-so).

Wednesday, October 9, 2013

Persimmon Pecan Cookies

Have you ever heard of a little fruit called a Persimmon? Well I hadn't, but guess what kind of tree we have in our new backyard... Yep, a Persimmon tree.

The shape of them reminds me of a cross between a cherry tomato and a plum, but the color reminds me of an apricot. They are small enough to fit 3 or 4 in the palm of your hand.


And naturally what is the best way to eat any kind of fruit? In the form of a cookie, of course!!  


And you should know I did a couple things different. 1) I didn't use walnuts, instead I used pecans. Because they were the nuts we had in the pantry. 2) I didn't use the same amount of persimmons. Mainly because didn't want anyone to think it was gross... So I did about half. Which in the end it was more like adding persimmon chucks instead of persimmon puree. That way those who didn't like them could remove them from the cookie.


Another thing to note is I think the persimmon tree in our backyard is a different type of persimmon then the kind in the post with the recipe. Because I did a google search and it turns out there are two or three different varieties of persimmons, some are sweet and some are spicy.
Overall I think this was a good recipe...because the cookie was good cold and warm, which is usually how you know you've found a good recipe! Next time I'll have to try it exactly how the recipe says :-P 


Sunday, October 6, 2013

Peanut Butter Bon Bons

Are you in the mood for a peanut butter cookie? And I don't mean a cookie that has peanut butter and chocolate or some combo like that, or your boring, standard peanut butter cookie.... I am talking about a cookie that is just peanut butter. Well, if you are, check this out...


This guy is call a Peanut Butter Bon Bon, but it's not a true bon bon because it's not rolled in cocoa powder or dipped in chocolate... so really it is just a Peanut Butter Bon... see what I did there? LOL!


I'm going to do my best to describe this... have you ever tried to eat just the peanut butter part of a reese's cup? Now imagine that peanut butter goodness as a cookie.


Baking these are so simple, you just have to be vigilant. You want to take these out of the oven as soon as they start to get golden... no later! Taking them out when they start to get golden helps them stay moist on the inside and just a bit crispy on the outside... like a thin shell protecting the chewy peanut butter. A fun thing with this recipe is that instead of spooning them onto the cookie sheet, you roll them into balls and then place them on the cookie sheet, this helps them keep the shape of circles.

Overall this is like a all time favorite for my family, so this must be a 5. My grandma says we should make them into full-fledged bon bons and dip them in chocolate, but I don't know... sometimes you just want the peanut butter and not the chocolate.

Friday, October 4, 2013

Apple Cranberry Pumpkin Bread and Chocolate Chip Pumpkin Bread


A couple of weeks after making the Cranberry Pumpkin Bread, my brother and I experimented with the recipe by  adding different things instead of the dried cranberries. We came up with two very tasty results.  
               
The first one is... Chocolate Chip Pumpkin Bread!


Have you ever had a Spice Cookie? Because that is what this combo reminds me of. And let me just add that you get a chocolate chip in just about every single bite, which I think is how you know you've put the perfect amount of chocolate chips in your batter. Another awesome thing about the chocolate chips is, when they came out of the oven and cooled I don't think that the chocolate chips completely re-hardened which made it messy, but so tasty!


The other combo is... Apple Cranberry Pumpkin Bread!


This combination was more like the Cranberry Pumpkin Bread... Just with the added kick from the apples. I have to say that this one was my favorite  out of the two, which is a little odd for me because I usually go for anything that is sweet and has chocolate. Two things to note with this combo... 1) my mom recommends Granny Smith apples for this because they are tart rather than sweet...which should kick it up a notch! and 2) the Apple Cranberry Pumpkin Bread had to bake longer than the Chocolate Chip Pumpkin Bread due to the moisture that the baking apples pieces added.


Both of these combos were awesome! I think these were 4 and a half stars. Soon I will post the recipe and I will be sure to include the measurements of the substitutions.


Tuesday, September 24, 2013

Milk-Chocolate cookies

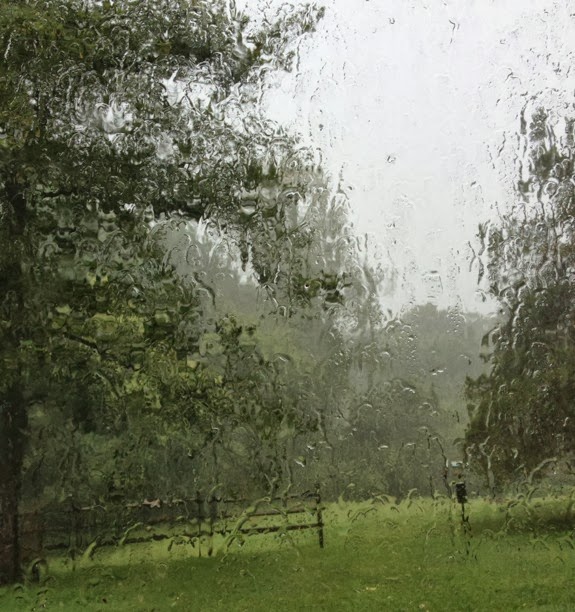
What it looked like outside
What do you do when it looks like this outside? Why, you read a good book (sometimes more than one) or bake some cookies! In my case, I did both!  After I was done with my school work I read. And then my Brother and I baked some cookies...


These  lovely little guys go by the name of Milk-Chocolate Cookies. We found this recipe in Mom's favorite cookie cookbook, Martha Stewart's Cookie Cookbook  
http://www.amazon.com/Martha-Stewarts-Cookies-Treats-Share/dp/0307394549/ref=sr_1_fkmr0_1?ie=UTF8&qid=1379860730&sr=8-1-fkmr0&keywords=martha+steart%27s+cookie+cookbook 
and we gave it a shot...
Einstein and the cookie. He kept looking at me like " Why are you putting this here?"

Thoughts...It went good. A couple things to note though. Once all the ingredients have been mixed into the batter, let the batter sit for a minute or two. This will help when you're spooning it onto the cookie sheet, that way the batter is not as runny. Another thing to note, is when the recipe says to put parchment paper onto the cookie sheet... DO IT! Or else when you are using the spatula to get them off of the cookie sheet, they will look like this...and this is with a non-stick cookie sheet.


Of course this doesn't effect the taste, it just makes them fun to eat and look just a tad silly!

The taste test - drum roll please! These cookies are chewy and chocolatey, which is one of the best combinations you could possibly come up with. Sometimes the top will come off as if it is a shell on top of the slightly gooey bottom.... What a fun little cookie!

One thing to note is when they start to crackle on the top and you can see inside a bit, they are ready to take out of the oven.
On a scale of 1 to 5, I just might say these were a 5 (the highest my scale will go!)


Saturday, September 7, 2013

Overlooked Baking Mistakes

So, last Sunday I was baking a Cranberry Pumpkin Bread. It tasted great when everything was done, but I made some mistakes. Not mistakes that affected the taste or anything, but these mistakes made my bread look funny. There were two mistakes... Mistake #1) I did not put enough batter in the pan so after it was cooked and out of the pan, they looked very short. Mistake #2) I kept opening the door to the oven! This resulted in them having to bake for longer, and the cool air rushing into the oven also made them sink a bit.

In honor of these mistakes I have created a list I like to call: Overlooked Baking Mistakes.

1) The Yield! Knowing the yield will help you know how much batter to put into each pan. Also a thing to note is if you put less or more batter in your pans, this will effect how long they will have to bake:-)

2) Knowing your oven. Knowing your oven includes, whether your oven is hotter or cooler than the average oven, does your oven have hot spots, and what kind of oven do you have? These questions will determine whether you will have to rotate the pans so it bakes evenly, when you should preheat your oven, and so on.

3) Opening the oven too soon! Yep. I am pretty sure everyone is guilty of this. Patience  Grasshopper!! You have to use other clues! Like, "Whoa that is way too pale! I know that won't be done yet."

4) Over/Under measuring. This can completely throw off your recipe.

5) Over/Under beating the batter. If you over-beat the batter it will be stiff, however if you under-beat the batter, chances are you will come across flour clumps when your eating what you baked later. So you really need to trust yourself and find that happy medium!

6) Folding certain ingredients in to the mix. This is so important for when you want what your baking to be airy, but it is also handy for when you mix blueberries or other fruits that you don't want to get smashed:-)

7) Bake time. It goes without saying that if you bake, say a cookie, too long it will be crunchy and if you bake it for less time it will be chewy - So pay attention to the bake time.

And last but not least...8) The pan sized. The size of the pan will often determined how long your baked goodie will be in the oven. It will also determined how many you can put in the oven at once!

***To prove my mistakes did not effect the taste of the Cranberry Pumpkin Bread... Well, I can't post a picture because they have already been eaten!!


Thursday, September 5, 2013

Simple Vanilla Cupcake with Buttercream Frosting!

Hello!! This is So Easy My Cat Could Bake It, my blog about my baking journey! I chose that name for my blog because Einstein, my cat, is my buddy! Right now I am experimenting with baking to see if it is something I want to continue to do after high school or just continue with it as a hobby.  Each week I will bake a recipe, then write about whether it passed the taste test, what I liked and didn't like, what I learned, and so on.
Out of the oven
So, lets give this a shot, shall we? For my first recipe I chose a simple vanilla cupcake with a vanilla butter cream frosting. Why? I am a beginner at baking, and I was looking at some baking blogs and they all recommended starting with something simple... Something that doesn't have a dozen ingredients. So I went and looked in my cupcake cookbook and there it was. The name of my cupcake cookbook is The Cupcake: 80 Cute and Colorful Cupcakes by Love Food from Parragon Books.


Thoughts... It went really well, though I had a little hiccup with the frosting. When I added the milk it would not mix into the correct frosting consistency and that was because I was mixing it by hand. So I put it in the mixer and it got to that nice frosting consistency.

Einstein trying the frosting!
Nice fluffy frosting
The Taste Test - drum roll please! The frosting: Oh wow! It was awesome! This recipe made a lot of frosting, so I was afraid the amount I put on the cupcakes would make it way too sweet, but nope. It was nice and smooth and it was fluffy! The cupcake: It was also good, but it wasn't as light and airy as a cupcake should be, it was a bit more dense, more like a muffin, I guess. The cupcake wasn't as airy as the cake box variety nor as light as a bakery cupcake. So I think I will have to torment everyone by making another batch :-) FYI, the frosting recipe was also from the cupcake book.
Next time I will try mixing it in the mixer to see if that will help air get into the batter, thus making it fluffier. I will also maybe add baking powder. I did not put it in the mix because the recipe said not to if your flour was self-rising, I wasn't sure about the flour, so I did not put any in.  

Overall: On a scale from 1 (hated it) to 5 (loved it) this recipe was a 4 (liked it)

***Mom said the flour is not self-rising. She gets the all purpose variety because it is used in more recipes.... thus, it's more versatile.