Tuesday, November 19, 2013

Tuesday Stuff

Alright, I think its time for an update on the dogs in our house...

Reba has been adopted... She is a Florida dog now and I am completely confident that she will be very spoiled, which is awesome! Her adopters renamed her Jasmine and it sounds like she is doing great. I love that they have been sending us updates... it makes me feel like we definitely chose the right family for her!


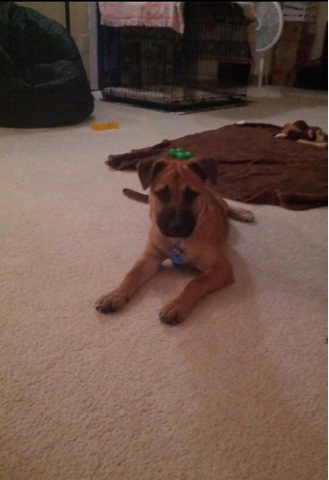
Jack has moved inside and is no longer using Mom's studio... so one of these days we will help her unpack her stuff and move in there. He was neutered on Friday and his healing is going great! He doesn't even seem to have noticed that he had a procedure done and we haven't had to put the cone of shame on him because he is leaving the stitches alone. We have discovered he gets along with dogs and doesn't mind the cats in the house (he will bark at cats outside - at least so far. We are taking it one step at a time to ensure the dogs get along and we don't have any problems... its a little complicated with having both older dogs and the puppy... everyone has a different play style. We are continuing the crate training, but he doesn't like it so much now that he can see and hear us... In the evenings we let him in the living room with us and our dogs. Most of his skin issues have cleared up, but it looks like he has some ringworm so we are now giving him medicine for that... sort of fighting it from the inside out. We are also putting anti-fungal cream on the spots on his body. The vet weighed him at 66, so he is definitely putting his weight back on:)He does real good at listening to us when outside and inside only gives us a hard time when it is time to go into his crate. We found him a few toys that he hasn't been able to destroy in 2 minutes... none of them are soft and squishy.


Charlie and Apple are getting along great with Luna and vise versa. Luna is doing great, she is playing and she recently discovered how to do zoomies, which is hilarious to watch! She is getting spayed today. She is up to 25 lbs and is doing really good with her crate training. I have no doubt that one day she will be trusted to hang out on Mom's bed with Charlie and Apple when we go shopping. She didn't seem to miss Reba too much when Reba went to her new home. The only trouble we have with her is that she is a slow eater and if the others show interest in her food, then she won't eat it. We can usually get her to eat if we get out a spoon and feed her from the spoon... She is training us!


Monday, November 18, 2013

Spice Cupcakes In A Jar


Some of the ingredients I used
Yes, You read that correctly... Cupcakes in a jar. I saw this on the cooking channel, and I just thought it looked so cool... so I tried it for my recipe for the week. This was basically just a tasty experiment.

 The first thing that happened was Mom and I discussed, the kind of frosting that would be in between the cupcake layers. We decided instead of having frosting in between the layers plus on top, I should do a filling and a frosting. Why? Mom pointed out that just frosting in between the cupcakes would be too sweet, a lighter filling would be nicer... plus it was an opportunity to add a different dimension to the cupcakes.


I used a box of Duncan Hines Spice Cake mix. I simply followed the directions on the box, poured the batter into regular sized cupcake pan (jumbo cupcakes would not have fit into the jars I had on hand.) After letting the cupcakes cool a little, I started making the filling. The filling has three ingredients... 8oz cream cheese, 1 tsp vanilla and about 1/4 cup powered sugar (that part really depends on how sweet you would like it).


You cream the cream cheese for about 3 minutes and then you add the vanilla and powered sugar. After about a minute of beating it, taste it to determined if you want to put more powered sugar or not.
The jar I used
Now comes the fun part (some assembly required!) I cut the cupcakes in half. In each jar there were three halves. Put one half in the jar and put some filling on it, then add the next half and some more filling on that. And then add the third half and don't put any filling on it because the frosting will be the final layer. And if you, by the way, have 3 or 4 cupcakes that can't be put into  a jar because you either don't have enough jars, or you run out of filling, they make great snacks and practice for your piping/creativity skills :)
My leftover cupcakes, They have some leftover frosting to top them off
Once I was done with building the layers, I made the frosting. The frosting has four ingredients... 1 cup pure pumpkin, 1 tsp Cinnamon, 11/2 cup heavy cream, and 1 to 2 cups powered sugar (once again its to taste). The first thing you do is  whip the heavy cream as if you're making whipped cream. While the heavy cream is whipping, mix the pumpkin and cinnamon. Once the heavy cream is to the whipped cream consistency, add the pumpkin mix. After that is combined (about 2 minutes) and 1 cup of powered sugar. Once again taste it to see if you want more powered sugar.

The next part is frosting the cupcakes in the jars. You can use a spoon to plop it on top or you can cut the corner of a Zip-Loc bag , put some frosting in it and frost the cupcakes that way. I did the latter after doing the former for the filling... using the bag is much easier than using a spoon... and it looks neater too. When you're done, they have to go in the fridge  because they have uncooked cream cheese and whipping cream.

In the fridge
The taste test... this reminds me of a seasonal recipe. The frosting does in fact taste like pumpkin flavored whipped cream, which for the record, is really good! The filling is good too, not too sweet, but not too cream cheese-like. But the whole cupcake together... well, it was like something was missing. Maybe they were too light or didn't have any zing. 
Overall: I like the whole cupcake in the jar thing, but the cupcake plus the whipped cream frosting plus the filling didn't really work together, at least in my opinion. However, I like the frosting and filling and I think they would be good with a different cupcake. Perhaps I will try this filling with a traditional frosting. And maybe add some cranberries to it... I do love pumpkin and cranberries together! This recipe was a 4 out of 5.

Buffy (left) and Einstein (right) checking it out.
P.S. Mom pointed out that the problem with the frosting is that the longer it is in the fridge, on the cupcake, it might make the cupcake more moist than usual.

Wednesday, November 13, 2013

Cranberry Christmas Cake


A couple of weeks ago, Mom sent me the link for this recipe and I wanted to use it for my recipe of the week. There was one problem with that plan of mine... it was October and no grocery stores had fresh cranberries. Flash forward a couple of weeks, Mom and Dad were at the store and Mom found some and grabbed a bag.


The batter before cranberries


This recipe is called Cranberry Christmas Cake. It reminds me of a coffee cake... the kind of cake that is good as a snack anytime of day. The awesome thing about this recipe is, it only has 6 ingredients - 3 eggs, 2 cups sugar, 2 cups flour, 3/4 cups butter, 1 teaspoon vanilla, and 12 oz (one bag) fresh cranberries.

 
The batter with cranberries


You might be wondering "well, how does it rise if there is no baking soda or baking powder?" Or "does it not rise at all?" It does rise. Instead of using baking powder or baking soda, you cream the sugar and eggs till the batter almost doubles. This step helps it rise, but it also makes it light. While you're creaming the eggs and sugar, you should butter your pan (or spray it).


After you're done creaming it, you add the butter and vanilla. Then you add the flour until it is just combined (that way you don't lose the fluff). And finally you stir in the cranberries and put it in your pan.I put it in for exactly 40 minutes at 350.

Dixie (left) and Einstein (right) checking out the foreign object.
The taste test... This is an awesome cake. I love how it is not dense, but not to fluffy, it is just right. I also like how the bottom is not burnt. I am a huge fan of the way the cranberries sort of just melted... almost. When you taste a bite of the cranberries it's a pop of tartness that balances out the sweetness of the cake perfectly.


This recipe is without a doubt 5 out of 5! In fact I made this last night and it is all most gone!I think it is a new favorite of my dad's... he took a piece for lunch after having a piece with breakfast!

The link to the recipe is here.

Tuesday, November 5, 2013

Sweet Potato And Applesauce Dog Treats

Charlie being so patient while I took his picture

For this post it is So Easy My Dog Could Bake It, because I am going to share and blog about a dog treat recipe I tried. With all of the news about treats and food from China being bad for dogs, I thought I should look up making dog treats. This is also good because you can save a bit of money making them yourself rather than going out and buying them.... and with 5 dogs currently in the house, saving money when you can, is important! 

This recipe was very simple to make and I think it is safe to say the dogs like them!


Sweet Potato
The recipe calls for four ingredients: 1 cup of sweet potato, 1/4 cup of applesauce, 21/2 cups of  flour and 2 eggs. I put the sweet potato in the microwave for about 5 minutes after I poked some holes in it, and then I scooped the sweet potato out of the skin.

Applesauce
 One of the things I learned with this recipe is it is really easy to make applesauce. You can either cut up the apples and put it in the microwave for 4 minutes with a tbsp of butter or you can do it on the stove with some water and butter. I did it in the microwave. And after I mashed it a bit I put it in the blender to cut the skins of the apple (but if you peel the apples you don't have to do this). Or you can use store bought applesauce, but frankly, I think this is more fun and I like how you know what is in it if you make the applesauce yourself. And it was just a good learning experience :-)

Apple and her cookie. She was not in the mood to leave it alone on her paw.
The Dough
Something I noticed about the dough was that it was extremely sticky, just about as sticky as a wet cookie dough. But in the end it was all right, I just had to put a little flour down on my counter-top so that it was easier to remove after rolling it out.


Bedtime treats

Another thing about making dog treats is cutting them. I did not use a cookie cutter, I just used a knife and cut them into two different sizes... the ones above and the ones below.

Training treats
They were in the oven at 350 degrees for about 20 to 25 minutes.

Overall I would say that these were a hit! Charlie followed me for a good 10 minutes after he ate his :-) I stored them in two separate sandwich bags... one for the small treats and a different one for the larger treats. It's been a couple of weeks and they still taste great! Oh, the most important thing... they are good for humans too! 

The link to the recipe is Here