Showing posts with label delicious. Show all posts

Friday, April 17, 2015

Chocolate Buttermilk Cake (From Scratch!)


I have been meaning to try baking a cake from scratch for a little while and I finally did it! It was awesome! So, without further ado...

Ingredients:

  • 2½ cups flour
  • ½ cup cocoa
  • 2 teaspoons baking powder
  • 2 teaspoons baking soda
  • ½ teaspoon salt
  • 2 cups sugar
  • 1 cup vegetable oil
  • 2 eggs
  • 1 teaspoon vanilla
  • 1 cup buttermilk
  • 1 cup hot, strong coffee (I used some of Mom's chocolate coffee!)


The first step is to combine all of the dry ingredients (but not the sugar) in a bowl and set aside.


Next, cream all of the wet ingredients (but not the coffee) together with the sugar. 


Once they are creamed together, slowly add the dry ingredients.


When the dry ingredients are all incorporated in the mix and when your coffee is brewed, slowly pour the hot coffee in against the side of the bowl while mixing. This is kind of like pastry cream, you DO NOT want to cook the eggs! Also, this batter will be thin, so don't worry!


Pour the batter into two, 8" rounds (make sure you spray the pans) and bake at 350°F for 20 to 25 minutes. A knife should come out clean when inserted in the middle indicating that they are done.


Now you can finish this up however you'd like. This is what my brother and I did...


So, to do the cake justice, I added some raspberry jelly to the frosting and only frosted in between the two layers. 

And my brother makes an excellent Ganache, so, we drizzled ganache on top and down the sides until we agreed that it was perfect!


This recipe gets 5 out of 5 cat whiskers! It was simple and amazing. And it was sooooo moist. It's definitely better than a box mix and just as easy!


I found the recipe here.

Tuesday, March 31, 2015

The Peanut Butter Overload Cheesecake


For my brother's birthday cake, he had one request: Peanut Butter. Upon further questioning, he said a cheesecake would be acceptable. So, Mom and I set out to make it contain all the peanut butter that a sane person would want and maybe a little extra for good measure.


Now, just a fair warning... Not only is this cheesecake peanut butter-y, but it's so rich. This cheesecake lasted for a good five days with four people eating it. I think that might be a record...

Also, this was my first time making a cheesecake and it was so much easier than I thought it would be!

The Filling:
  • 32oz of cream cheese
  • 5 eggs
  • 11/2 cups of brown sugar 
  • 1 cup of smooth peanut butter
  • 1/2 cup cream
  • 2 tsp of vanilla
  • 1 pinch of salt

The Crust:
  • 2 cups crushed graham crackers
  • 1/3 cup sugar
  • 1/3 cups cocoa powder, unsweetned
  • 1/2 cup butter, melted
  • 1 pinch of salt
The Topping: 
  • Peanut butter
  •  12 oz peanut butter cups, chopped


I'll start with the crust.
In a bowl, combine the dry ingredients.


Once they're combined, dump it in a spring-form pan. Add the butter to it and mix it around. You can form the crust when you're ready. You can go all the way up the sides or half way. I did it half way because I prefer most of the crust to be on the bottom.


When the crust is to your liking, bake it for 10 minutes at 350 degrees, then set it aside to cool. It's time for the filling.


In a mixing bowl, add the cream cheese, vanilla, salt, and brown sugar. Mix them together until they're thoroughly combined.


Next is adding the peanut butter. Mix it together.


Now, this might taste good, but it's too thick for cheesecake. So, now we add the eggs one at a time. Add a egg, Mix it in. Add a egg. Mix it in and repeat. Once all the eggs are in, add the cream. Keep mixing it until it's nice and smooth.


Once it's all smooth, the filling is done. Pour about half of the filling into the crust. Sprinkle some of the peanut butter cups. Not a lot, just enough so that it's not all cheesecake. Then, pour the rest of the filling on top of that. Then you can bake it. 


Don't forget the water bath. we put it in ahead of time and I think that made all the difference. After the cheesecake had baked and cooled, it didn't crack!


After the cheesecake has cooled a bit, it's time for the final stage... adding the toppings. The topping is simple. Sprinkle the remaining peanut butter cups on it.


And then, put about 2 spoonfuls of peanut butter in a sandwich bag, microwave it for like ten to twenty seconds. Cut one of the corners and proceed to drizzle the peanut butter on the cheesecake. If you don't want to do this part, that's fine, but I think that the cheesecake needs the peanut butter... It's kind of a break from the sugar.


It looks great and tastes AWESOME! I think my dad may decide he wants something like this for his birthday this summer. Now I need to think about what kind of dessert I want for my birthday :-).

This gets 5 out of 5 cat whiskers!
This recipe is a M&D original!

Friday, July 11, 2014

The Apple Pie Experiment


What would happen if you combined apple pie and an apple turnover together? My mom and I did an apple pie experiment with those two things in mind. And it is the very definition of delicious!


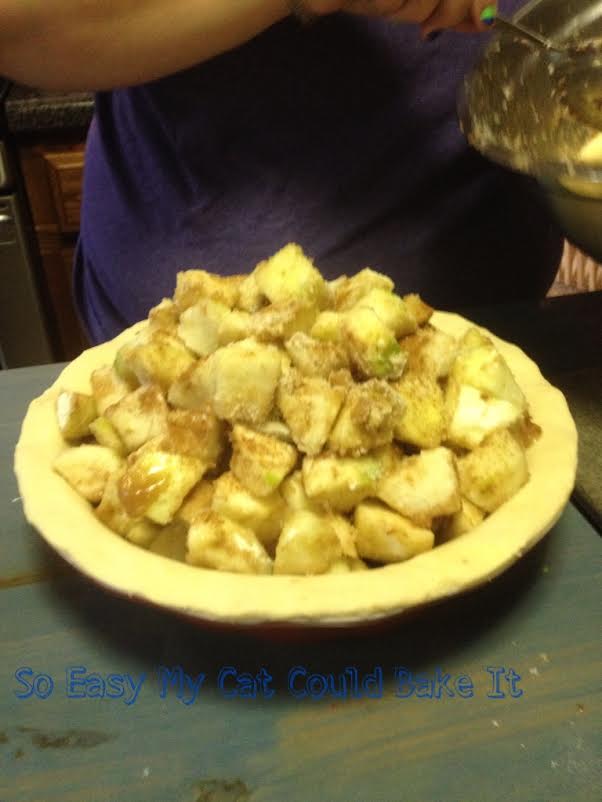
For the crust we used ready made pastry crust. We used two packages of the pastry sheets you can find in the freezer section. One box for the bottom and one for the top.

I recommend that you bake the bottom crust for 10 to 15 minutes before you put the filling in it and then the top crust. The reason I recommend this is because we didn't and the bottom didn't quite get cooked all of the way.


The filling was your standard apple pie filling... some Granny Smith apples, sugar, a pinch of cinnamon, etc.:-) What I'm saying is that you can use the filling from your apple pie recipe, because I know that everyone has their own special recipe, if you don't, there are plenty available online. The one my mom uses isn't written down anywhere... one day she will measure the ingredients out, write it down, and give it to my brother and I.


Once you put the apple filling in the pie dish with the crust, it's time to open the second package of pastry sheets. You'll want to roll them together on a piece of wax paper, or else it will be harder to get it on top of the pie. You will want to press the two sheets together to form one gigantic piece!


When you get the top crust on, make sure you cut slits and make sure to press the edges together well. We folded the edges under, for an extra thick crust.


This next part is optional. We wet the top slightly with water and then dusted it with coarse sugar. You could use an egg wash instead of water or you can skip this part.


We baked this at 400°F for about 45 minutes.

An up-close look at the rise of the crust!
It just looks gorgeous, doesn't it? Nice and golden and flaky! I just can't help but give this 5 out of 5 cat whiskers even though we should have cooked the bottom crust separately! I can't wait to try this again when the local apples start arriving at the farmer's market :-).